Archive for the ‘Defensive Drills’ Category


Purpose

This drill will teach kids how to tag a runner between bases.  As a T-Ball coach, I often see runners run right by an infielder holding a ball, while the fielder doesn’t know what he’s supposed to do.  There are usually several opportunities to make outs per game that are missed because the kids don’t understand that they can and should try to tag a runner.  This is one of the “Super Fun” drills that the kids love.  It’s always one of their favorites.

This drill is designed for T-ball age children, but can also be used for coach pitch age if it’s obvious that they don’t know how to tag a runner.

SetupTagging-Drill

  • Each kid should have their glove and a ball.
  • With 4 bases setup at the appropriate distance, evenly distribute all kids around all the four base paths, including between home & 1B, and 3B & home.
  • Appoint 2 or 3 coaches (or dads) to be base runners, starting at home plate.

Procedure

  • Demonstrate to the kids how to apply a tag:  Ball in glove, and throwing hand on ball making sure the ball does not fall out of the glove during a tag.
  • One of the runners begins at home plate and runs all the way around the bases without stopping.  Continue to run even after getting tagged out and don’t stop until you get back to home.  As he’s running, he should try to avoid being tagged by dodging, ducking, changing direction, etc.  It’s ok if he runs out of the basepaths a little bit, but try to stay within about 5 feet of the basepath.  The kids could see this type of behavior in a game.
  • Once a runner gets past 1B, start another runner.  This will keep all the kids active, trying to tag runner after runner, with no time to get bored.
  • If you are keeping score, the runner can call out each fielder’s name that tags them so that another parent can record the outs/points.

Additional Notes

  • Make sure the kids understand that they can make outs like this in the games.  Explain to them that anytime they have a ball and there is a runner nearby or coming toward them, they can tag them for an out.

Purpose

This is a great drill and will teach kids how to force a runner out at a base.  As an inexperienced T-ball coach, I would spend the majority of our infield practice working on throwing the ball to 1B.  I eventually realized that the majority of the plays, probably about 2/3, in game situations call for force outs at bases, and many of the kids were not able to get a force out, primarily because we hadn’t worked on it in practice much.  There are situations that require throwing to 1B, but they are not as often as some may think, especially in T-ball where the majority of kids run station to station.  I would guess about 90% of outs recorded in T-ball come from “field and step on your base” force outs rather than throwing outs.  This drill is also good for base-runners because it helps teach them a sense of urgency, knowing that they are “racing” the fielder to the base.

This drill is designed for T-ball age children, but can also be used for inexperienced coach pitch age players.

SetupForce-Out-Drill

  • Setup an appropriately sized infield diamond with home and 3 bases.
  • There will be 3 stations, with at least 1 coach assigned to each station.  The 3 stations are 1B, 2B and 3B.
  • Using 3 cones (1 per station), place one at home plate, another 1/3 of the way between 1B and 2B, and another 1/3 of the way between 2B and 3B.  This is where the runners will start from.
  • Divide the kids into 2 equal groups: 1 group is the fielding group and the other group is the base-running group.  You will need at least 1 fielder and 1 runner for each station.
  • Place a defensive fielder at 1B, 2B and 3B.  You can also place one at SS if you have more kids.
  • Place 1 runner at each cone between the bases.  If you have extra runner, just line them up behind home plate.
  • Position the coaches as shown in diagram: 1 at home (for 1B group), 1 near the pitching circle (for 2B group) and 1 between the pitching circle and home plate, near the 3rd base foul line (for the 3B group).

Procedure

  • When each coach says, “GO!”, the baserunner is to run to the next base as quickly as possibly.  At the same time the coach says “GO!”, he rolls the ball to the fielder.
  • The fielder is to field the ball and try to step on his base before the runner reaches the base.  The runner is to try to beat the fielder to the base.
  • After the play, the runners advance to the next cone (or back to home after reaching 3B) and the drill is done again.
  • After a few attempts for each fielder, rotate the fielders.  Continue to rotate until each fielder has worked in each group.
  • After all the fielders have done a full cycle at each base, have the fielders become base-runners and the base-runners become fielders, and start over.

Additional Notes

  • Make a big dramatic safe or out call on each play.  This one aspect is what makes it Super-Fun.  This kids love this, especially the ones that get the call going their way.  It will motivate them to try harder.
  • Coach runners to run through 1B but not to run through 2B and 3B.  When a runner does come off 2B or 3B, coach the fielders to tag them.
  • Often the kids will be in a hurry and not be able to pick up the ball successfully.  Reinforce to them to get the ball first, and then sprint to the base.
  • If you have less than 6 kids, then use fewer stations.  If you have more than 6, you can add a SS as a fielder, or have the kids double up and take turns at one or more of the positions.

Purpose

You may have noticed that many young kids don’t understand the concept of “urgency”.  Without a sense of urgency, getting outs on defense will be rare.  How many times have we seen a 5 year old successfully field a ground ball, only to stand there and hold the ball as the runners round the bases.  Or maybe they know they are supposed to throw the ball, but they go through the motions very slowly.  This drill attempts to teach kids that sense of urgency when making a play by picking up a ball and throwing it as quickly and accurately as possible.  And as always, the drill is designed to be a lot of FUN for the kids.  If you need a more fun-sounding name, you can also call this the “Bean The Coach Drill” 🙂

This drill is designed for kids ages approximately 6 and under.

SetupUrgent-Throwing-Drill-Setup

  • Each kid will need their glove, and you will need a baseball for each kid.  I strongly recommend that you use T-balls (soft) for this drill.  You’ll quickly understand why.  You will also need to designate one coach as the target/catcher/guinea pig/sucker.
  • Warning: The coach may want to wear some protective equipment, depending on how hard the kids can throw.  I did not wear any gear the last time I ran the drill, but I’m pretty brave and don’t mind bruises.  A catcher’s helmet may be a good idea.
  • The coach will be the central point of this drill.  It probably makes most sense to have the coach stand on 1B, but it can be done anywhere.
  • Distribute all the kids evenly in semi-circle/arc equidistant from the coach.  Have them spread out at least arms length apart, with gloves on.  As the coach, you will want to be able to see all the kids in your view, so don’t wrap them around you too far.  The farther you put them away from you, the more kids you’ll be able to fit into your view.  But they need to be close enough to be able to throw a ball to you.  If you have too many kids to fit them all into your view, you can split it up into 2 groups, 2 coaches, running 2 separate drills.
  • Place a baseball on the ground about 1-2 feet in front of each kid.  For a little more advanced version of the drill, you can move the balls a little farther away from the kids so they’ll have to take a few steps to get to the ball.

Procedure

Setup

Setup

  • Instruct the kids that when you yell “Go,” they are to all pick up the ball and throw it to you as quickly as possible, and that you will catch the first ball that gets to you.
  • Whose-ever ball you catch will get a point/star/win, etc.  If you have a wide range of skills and want to make it competitive for all the kids, you can say the winner of each round will sit out the next round, until it gets down to 2 kids.  If there is a specific kid that you think needs some positive encouragement, you can always try to catch their ball (even if it may not be the first one to arrive to you :-).
  • As you can imagine, the balls will be flying at you fast and furiously, and the kids will LOVE this.  Your job is to try to catch the first ball to arrive, and just let whatever happens happen with the rest of the balls :-).  I would recommend the “catch 1 and dodge the rest approach”.
  • Reset and repeat as necessary.

Additional NotesUrgent-Throwing-Drill-Karaoke-Competition-Setup

  • You also want the kids to position their feet and body correctly before throwing, however that is another drill in itself (see Foundation Throwing Drill).  So you may want to do that drill before doing this drill.
  • Even though they have their gloves on, make sure the kids pick up the ball with their throwing hand.  They need to learn to pick up a stationary ball with their throwing hand rather than with their glove.
  • Make sure the kids stay on their feet and do not fall down or go down to a knee to pick up the ball.
  • Another option for this drill is to have the winner of each round move on to the next competition at 3rd, where they do a head-to-head competition.  The winner of that one moves out, and the loser faces the winner of the next round from 1B.

Purpose

This post demonstrates what the Power Position should look like.  This is the position that a kid should be in before every throw.  Here is a catcher and 2 pitchers.  Don’t worry about the lower body.  Just focus on the front arm with the glove elbow pointing to his target, and the throwing hand behind the head with the ball facing backwards.  Kids 7-8 and younger probably should use 3 fingers on the ball, while older kids can use only 2.  Make sure they get their fingers lined up across the horseshoe seems.  Practice getting into this position at home.  You don’t even have to throw.  Just make sure they can get into the Power Position as quickly as possible.

Power Posistion

Catcher in the Power Position

Power Posistion - Rivera

Mariano Rivera in the Power Position

Power Posistion3

Pitcher in the Power Position


Purpose

In the game of T-ball, I believe one of the most underrated and neglected aspects of the game is baserunning.  When it comes to games, baserunning is often the difference in whether teams win or lose games.  I would say that over 50% of the outs recorded could have been avoided with proper baserunning.  Yet, I don’t think coaches spend much time on it because it’s a difficult and frustrating skill to teach 5 & 6 year olds.  And the generic “run around the bases” after practice doesn’t help much because it’s not simulating the game situation and most T-ball kids run station to station on each hit.  The first important thing a kid needs to understand is how to get a good jump.  And this is probably the easiest part of baserunning to teach.  This drill will teach the kids how to get a good jump, taking off on the swing of the bat.

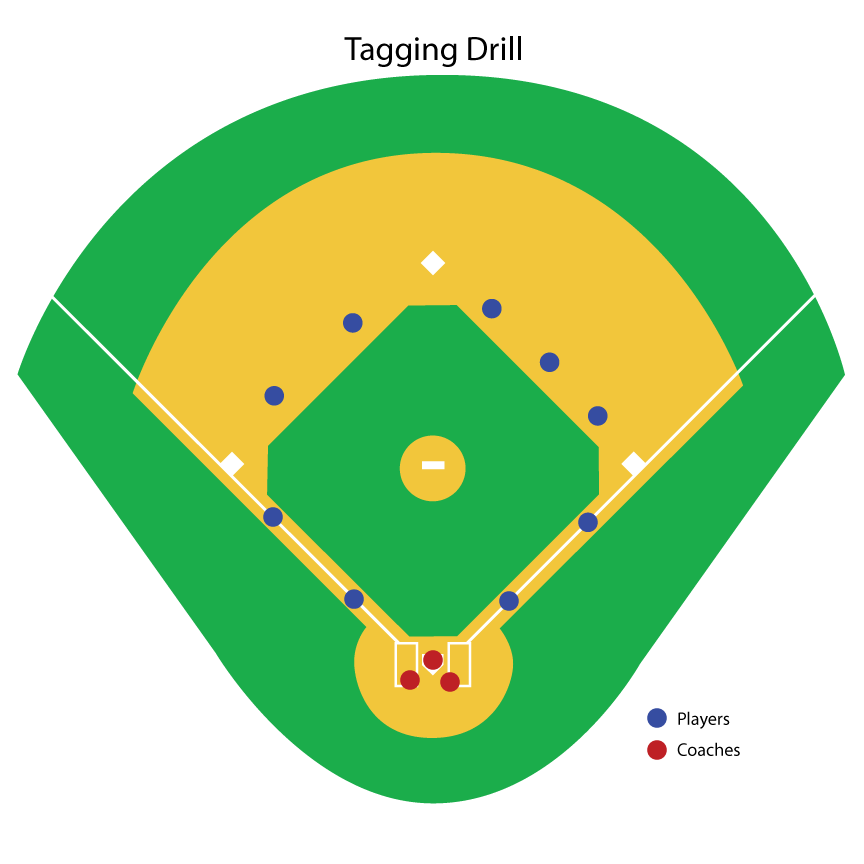
This drill is designed for T-ball aged kids, but can also be important for any age kid that plays tight bases.  There are 2 versions of this drill: 1 for small groups that focuses on only baserunning, and one for larger groups that incorporates some infield practice as well (to ensure all kids stay active).  In this large group, full squad drill, half of the kids will be runners, and half will be be infielders.

SetupBaserunning-Jumps-w-Infield-Drill-Setup

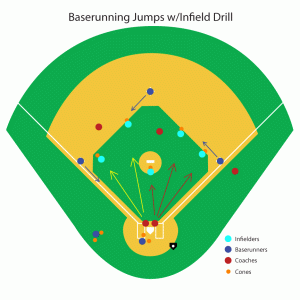
  • Place cones in the infield where each kid will be playing.  This helps speed up the drill so that each kid does not have to be positioned each time.
  • Load the bases with 3 kids, and put one at home plate to act as the batter.  Have the rest lineup behind a cone near home plate, but out of the way.
  • Place 2 coaches at home plate, 1 coach as the 1B coach, and 1 as the 3B coach.  If you have extra help, a coach can stand behind 2B as well to help instruct the runners at 2B.  However at some point they’ll have to be able to do it on their own at 2B because you won’t have a coach there in games.
  • Give the batter a plastic bat.  They will swing it to simulate game situation, but will not hit a ball.

Baserunning Procedure

  • Demonstrate at 1B to the kids how to position their feet on the base when the batter is ready to hit.  One foot on the edge of the base ready to push off, and the other foot out in the dirt.  Age young ages its preferable to teach them to put the left foot on the base and right foot in the dirt because this allows their body to be in a better position to see the batter.
  • Explain to them that as soon as the batter swings, they are to explode off the base like a sprinter hearing a starting gun.  I show our kids a video of Usain Bolt winning a 100m sprint.  That’s what they should be running like from base to base, anticipating the swing to get a quick start.
  • With the bases loaded, give the batter a plastic bat.  Have the batter get in the batters box, position his feet and take his swing.  On the swing, all runners should be off and running.  If they are not getting a good jump, help them.
  • if you are keeping score, the kid that gets to his next base first is the winner.
  • Continue until all kids have rounded the bases at least once.

Infield Defense Procedure

  • Explain to the P and 2B’man that if the ball comes to them, they will throw the ball to 1B.  Explain to the 3B and SS that they will field the ball and step on their base.  Explain to the 1B’man that he will cover 1B for the P and 2B or will field the ball and step on his base if the ball comes to him.
  • The infield will work in 2 groups.  3B/SS will be a group, and P/2B/1B will be the other group.  1 coach near home will be assigned to each group for the purpose of rolling ball them them.
  • When the batter swings the bat, the 2 coaches near home will roll a ball to a kid in their group.  They are try to get an out.  Left side should go for a force out at 3B or 2B.  Right side should attempt to get the out at 1B.
  • After a certain # of ball have been rolled (at least 1 to each kid), rotate the fielders and continue.  Continue rotating until all fielders have played each position.
  • At this point, swap the Infield group and the Baserunning group and start over.

Additional Notes

  • Make sure the baserunners are running through 1B and home, but not 2B or 3B.  They can practice sliding at 2B and 3B if they are able.

Purpose

This drill will teach kids how to get the ball back in quickly from the OF to the infield, and also teach the infielders what to do with the ball when it arrives.  One of the most frustrating things as a coach is to see an OF’er pick up a ball and stand there and hold it, while the runners are rounding the bases.  And screaming “THROW IT!” usually does not help any :-).  They look as if they are frozen or in a state of shock.  This happens because the child does not know where to throw the ball, so they just hold it.

This drill is designed for T-ball through Coach Pitch age children, but also may be helpful with inexperienced kid-pitch age kids.

Setup

  • Divide the kids in to 2 equal teams (preferably evenly skilled also).
  • Place 1 cone where the Left Center (LC) fielder plays and another cone where the Right Center (RC) fielder plays.
  • 1 team will be positioned in LC field and the other team in RC field.  The “active” kid will be at the cone and the rest of the kids will be several steps behind him out of the way.  You may want a coach/dad out helping with the organization.
  • In addition, the LC team will need to position 1 kid at Short Stop and the RC team will need to position 1 kid at the 2B position.
  • 2 Coaches (1 for each team) will be positioned at the pitching mound.  These coaches should each have a baseball.

Procedure

  • Explain to the kids that when the ball comes to the OF, they will get the ball and throw it back in as quickly as possible.  Do NOT hold the ball.  Do NOT run with the ball.  Just pick it up and throw it to their infielder which should have his arms up in the air.
  • Explain to the infielders to hold their arms up so the OF’er will know where to throw the ball.  Also tell the infielders that you will yell out a base when they get the ball, and they will have to run as fast as they can to that base.  The first infielder to get to the base with the ball scores a point for their team.
  • At the same time, both coaches at the pitching mound will throw the ball to their OF group, simulating a batted ball.
  • The OF’ers are to get the ball and throw it back in as quickly as possible (no HOLDING the ball, no RUNNING with the ball).
  • As the ball is approaching the infield, the coach will call out a base (1st, 2nd, 3rd, Home).  Most game situations will probably be 2nd or 3rd base, but go ahead and mix in some 1st and home as well just to make sure they are listening and identifying all the bases.
  • The first infielder to get to the base called out scores a point for their team.
  • Allow each OF’er to take 1 turn, and then choose another kid to be the infielder.  Keep going until all kids have had a chance to play the infield.
  • You can keep team scores to see who ends up with the most total points.

Additional Notes

  • Make sure the kids stay on their feet and do not fall down when going to pick up the ball.
  • If a ball is stopped on the ground, make sure the kids pick it up with their throwing hand, and not with their glove.

Purpose

I believe the very first thing a child should learn in baseball is how to properly throw a baseball.  Unfortunately, the mechanics of throwing do not come naturally for most kids and need to be taught and developed through repetition.  This drill is designed to teach kids how to throw a baseball correctly, including getting their feet in position to throw the ball.  As with many athletic actions, footwork is crucial because your feet are your foundation.  Without a proper foundation, throwing a baseball is not only difficult and discouraging but can also be harmful to a child’s arm.

This drill is designed for a child of any age that is learning or having trouble throwing a baseball.  If you are implementing this into your T-ball practices (which I would strongly encourage), I would recommend doing it at both the beginning and end of practice, working on it for only a short time each session, and then encouraging the parents to work on it with the kids at home (Give them this link :-)).  This is a crucial skill to develop for any kid to be able to enjoy the game of baseball.

Setup

  • You will need to draw a plus sign “+” on the ground a little wider than a kid’s shoulder width.  You can draw on the ground in many different ways depending on where you are practicing.  Some possibilities are: 1) Spray Paint (may not be appropriate in some places), 2) Baby Powder, Corn Starch, etc can be sprinkled in the grass, 3) Drawing with your finger or stick in the dirt, 4) or Chalk if you are on concrete.
  • You will need a plus sign for each kid doing the drill.  The more plus signs you have, the more kids that can do the drill simultaneously, and therefore less boredom and loss of attention.
  • Each kid will also need his glove and a baseball.

Procedure

  • First, assuming the target at which you will be throwing is at the “North” (top) position of the plug sign, have the kids place their feet on the “East & West” endpoints of the plus sign, facing their target, with the baseball in their throwing hand in their glove, hands together positioned somewhere between their belt and chest.
  • Kids should hold the ball with fingers across the seems as shown in this article: “How to Grip a Baseball”.  Younger kids, approximately 7-8 and younger will probably need to use 3 fingers because their hands are smaller.  If you see a kid throwing ball that appears to have a sideways spin, or goes in a different direction than where they are airming, that’s a good sign they are using 2 fingers instead of 3, causing the ball to slip out the side of the hand.
  • Explain and demonstrate to the kids the action of jump-switching their feet to the “North & South” endpoints of the plus sign.  Their glove hand and foot should go to the target (top of the plus sign) and throwing hand and foot should be behind on the southern point (bottom) of the plus sign.  This jump-switch action can be described as jumping on a skateboard, which may help the kids understand and enjoy the drill more.
  • At the same time of the jump, the hands should break apart from their belt buckle.  The frontside elbow should be pointing at the target, while the ball should be raised behind their head with the ball facing away from them.
  • To help the kids to understand and remember to aim their frontside elbow, you can use some rulers and wristbands.  Put the wristband on their upper arm around their bicep, and place the ruler inside the wristband positioned to where it will not be in the way of them bending their elbow, and so that it points in the same direction as their elbow.
  • This is what I will call the “Throwing Position”.  I’ve also seen it called the “Power Position”.  Once the kids have a handle on the footwork, there is a more advanced version of this drill called the “Throwing Position – Base Recognition Drill”.
  • When a kid gets into the proper position, both lower body and upper body, there’s not much left to do but THROW THE BALL.  This is the part that comes natural for most kids, but getting into the proper throwing position FIRST does not come natural.

Additional Notes

  • As with most things, the key to learning to throw a baseball properly is REPETITION (doing it the correct way).  So this is something that is strongly encouraged to work on at home, daily, even if it’s just 5 minutes or less.  You can even work inside the house with soft balls (nerf/sponge balls).